Friday, July 17, 2015

Friday Fun: Exponents in the Real World

Hi guys!

I'm super excited to share this week's activity with you all. I try to come up with activities for the students to do on Fridays that are different from our day to day routine. I know the last thing I want to do on Friday is to listen to myself talk, and I'm sure the students don't want to sit and take notes every day of the week. I've thought about creating a series of some of the activities I do with my kiddos on Fridays, and decided to jump right in this week!

For the first week of school, I'm going to be going over evaluating expressions with my Algebra 1 students, including exponents. I discovered the website http://robertkaplinsky.com/ and found a great activity there on how to create strong passwords that used exponents in the real world! I decided to adapt the lesson plan I found there, and created my own worksheet to accompany the activity.

Ladies and Gentlemen, may I introduce you to Ms. B's Math Minions!
The latest and greatest social network for Math with Ms. B!
In this activity, the students create their own login information for my fictional math social network (which should definitely become a real thing). They then give guesses for how long they believe it would take a computer to crack their passwords. After the students make their guesses, I show them this video. 


The video shows that a computer can crack a simple password in seconds!

After scaring the students that all of their social media accounts will be hacked, we will go over the math that works behind password requirements. The students will discuss how different characters (uppercase letters, lowercase letters, numbers, and symbols) affect how many potential passwords a computer would have to guess before choosing the correct one. They will also discuss how different lengths affect the total amount of potential passwords, and come up with a generalized formula for amount of possible passwords for different requirements. (Amount of potential characters ^ number of characters used). 

To really bring students up to speed with password technology,  I show them this article which states that a supercomputer can cycle through 350 billion passwords per second! Second!! 


So now that they are really scared about what they decide to upload to the internet, (as they should be) I split the students up into groups of 3-4. Together they will come up with a set of password requirements that they feel will make their passwords secure. They will also use their new real world knowledge of exponents to calculate how long it would take a computer to hack a password with their group's requirements. Finally, they will decide what they believe is the single most important requirement for a strong password!

To end the lesson I will explain to them that most websites have security measures in place to prevent computers from hacking passwords using this method. If there are 218 trillion possible passwords, the probability of a computer guessing correctly withing the 5-6 tries before the website locks the account are nearly impossible. =)

And that's it! This may be a two day lesson plan depending on the amount of time you have. I intend on completing the lesson in 40 minutes, but we all know how that goes.

If you are interested in seeing the original activity, it is available for free at  http://robertkaplinsky.com/work/how-can-we-make-stronger-passwords/

If you would like to download a copy of my adaptation and accompanying worksheet, you may do so here!

Thanks for reading.

Ms. B.

Friday, July 10, 2015

Guided Practice Stations

Hello all!

Stations are probably one of my favorite activities to do with middle school kiddos. They get them up and moving out of their seats, and they are easy to create! For this weeks lesson, I created a set of math stations that cover properties of real numbers.


To make these stations I just copied problems out of our textbook and added some extra questions to each problem. I also created some easy to read data tables and added some pictures to keep things interesting. =) If you work with a science or reading teacher in the building, this can also be a great way to teach across the curriculum.


Stations are great because they help awaken the competitive nature in students. Everyone wants to finish first. I keep an answer key at my desk so when a student finishes all of the questions in his/her station, I can check over the answers. Once I approve the answers, the student can move on to the next station. This is also a great way to differentiate for different ability levels in students. Everyone begins at station 1, and as students finish each problem the class spreads out. This gives me an easy visual of who is on track and who may still need some extra help. It also provides opportunity for me to work one on one with struggling students without causing embarrassment in front of the entire class because everyone has to check answers with me before moving on.

If you would like to use these math stations in your own classroom, I have it available on my TpT store for free! You can download it here.

Do you use stations in your classroom? What are your experiences?

Thanks for reading.

Ms. B

Friday, July 3, 2015

Ordering Real Numbers Activity (Pictures coming soon!)

Hi all!

I just finished up my first activity for the school year! Yay! I'm pretty excited to try this out with my kiddos, and of course I will post an update once we complete the activity. So let's get to it!

My advanced 8th graders are starting the year off by reviewing Number Systems, specifically rational and irrational or "real" numbers. I wanted to do an activity that would get them out of their seats and review ALL of the numbers: positive, negative, rational, irrational, you name it! What better way to do this than to turn them into a giant number line!

Materials you will need:

  • Plain duct tape (Colored tape works fine for this activity, as long as there isn't a pattern).
  • Ruler
  • Sharpie or other permanent marker
  • Real Numbers Task Cards
Before class starts you will want to clear out a space to put your number line. The kiddos are going to be standing on it, so there needs to be lots of space. Create the number line by placing the duct tape on the floor in a straight line. You want the line to be as big as possible so the students aren't squished together. Using a ruler and Sharpie, label the number line in increments of two. (The increments can be different depending on class size/ability level. I have a small advanced group, so I chose two). If you are blessed with a classroom using those convenient 1 foot floor tiles you may not need a ruler. My classroom has carpet, so I need one to make my spaces even. Make sure that zero is in the center of the number line, and the line goes to positive and negative 10.  You may want to cut out the task cards prior to the activity as well. I plan on laminating mine so they last awhile, but the students can always cut them out at the beginning of the class period. 

The Activity

Pass out the task cards to each student. I'm incredibly lucky and only have 5 students in my advanced group this year, so my students will have multiples. I made my task cards two sided, so each student will be able to go at least twice.
Task Cards! Cut them out, fold them up, and you are good to go!
One by one, have each student walk to his/her place on the number line that matches the number on the task card. You can call students one by one, or I created a "Teacher Cheat Sheet" with all of the numbers I used on the task cards. Calling them up by their task card numbers gives time for students with difficult fractions or square roots to convert their number to a decimal and figure out their place on the line. While students are waiting their turn, they will plot each number on a number line worksheet. You can easily create one of these yourself at TheMathWorksheet.com. My number line on the floor is in increments of two, so I reflected that on my number line worksheet. The worksheet provides an easy way to assess students at the end of the class period, and helps to keep students engaged while they are still at their seats. 

And that's it! Continue plotting numbers on the line until the task cards run out or time runs out! I ended the lesson by reviewing which side of the number line is positive and negative, as well as what makes a rational and irrational number. 

I have this lesson uploaded on my TpT store here. The download includes a full lesson plan, 28 pre-made 2 sided task cards, Teacher Cheat Sheet, and number line worksheet! I spend a lot of time creating materials for my store, and would love it if you guys checked out some of my resources. You can also easily make your own task cards using index cards if you like. 

Sorry I'm low on pictures for this lesson at the moment, but more will be uploaded when we do the activity!

Thanks for reading.

Ms. B

Friday, June 26, 2015

DIY Integer Manipulatives

Hi guys!

I hope you are all having a wonderful, well deserved, summer break. Today I am here with an easy DIY for the coming school year. Integer manipulatives!

Now I know that there are several items like this on the market like two colored counters, but let's be honest. Those things are made out of paper, and they will get filthy, bent up, and lost. I wanted to find something a little sturdier, so I decided to make my own! This project is super easy, and only cost me about 7 dollars.

You will need:

  • Scissors
  • 2 plastic sandwich bags
  • 1 paper plate
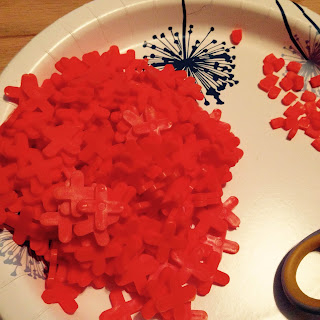
  • Tile spacers

Tile spacers are found at any hardware store in the flooring section. They are typically placed in the corners of floor tiles to ensure that they are evenly spaced. They also conveniently look like little plus signs!

I bought the 500 count bag, but there were several other sizes and amounts available at my local hardware store. These cost me about 7 dollars at Lowes. 

Step 1: Separate half of the tile spacers into one of the plastic sandwich bags. These will be your positive (plus sign) integer manipulatives! (Told you this was easy). 

Step 2: Cut two of the edges off of the sides of the remaining tile spacers to make negative (minus sign) manipulatives. I used a paper plate to catch all of my extra little pieces. 

And that's it! Put the negative signs into a sandwich bag and you're done! 


I like these because they look like positive and negative signs, which I feel will help solidify the idea of integer relationships for the kiddos. Two color counters work for this as well, but by the time you get them passed out, explain which color represents which sign, and get everyone on the same page, the class is over. This simplifies the process because you can work with positive and negative signs! Plus these are made of a pretty sturdy plastic instead of paper so they should last forever!

Thanks for reading!

Ms. B


Friday, June 19, 2015

Classroom Management

As a new teacher, I have to say that classroom management stresses me out the most. Teaching math? No problem. Create engaging lesson plans? You got it! Getting a group of 13 year olds to listen and do what I say? Yikes!!

I've worked long term substitute positions in two different schools that implemented a program called Positive Behavioral Intervention and Supports or PBIS for short. Basically, it is a school wide behavior management system that encourages and rewards students for exhibiting positive behaviors. There are usually large rewards outside of the classroom at the end of each quarter for those who qualify, and students that do not qualify stay at school with a teacher. What I really love about this program is that it highlights and rewards positive behaviors, and puts less focus on negative behaviors. It also gives the students incentive to focus and obey classroom rules.

The school I am currently working for does not use the PBIS program, but I wanted to bring the philosophy into my class. I do this in a few ways. I typically show a short, silly, 1-minute video at the end of the class period on Fridays to reward positive behavior throughout the week. I also try to come up with an activity or game for the students to complete on Fridays to get them out of their seats and interact with the material in a different way. More on that later. For now, I want to focus on these bad boys.
That's a lot of positives!
Enter the Behavior Punch Card! I created these using clipart from Creative Clips which you can check out here. The idea is simple. I print these out, cut them up, and distribute them to the students. When the students exhibit positive behaviors that I want to continue, I punch one of the thumbs on their punch card. When their card is full, they may turn it in for a reward! Easy peasy. And here's the beauty of it. The students are responsible for keeping track of their own cards! (See an ongoing theme here?) If a student loses track of their behavior punch card, they can begin a new one, but they lose their old punches. 
Thumbs up for positive behavior!
The cards are also easily adaptable. If I lose track of my hole punch, (likely) I can use stickers, stamps, markers, you name it! There are 10 punches on each card, so students will typically be rewarded every two weeks. I've also thought about offering a couple large rewards so the students can "save up" punches if they choose.

 So what happens if a student has negative behaviors in class? To put it simply, they lose their punch for that day, and of course further consequences will be assigned if necessary. I'm also playing with the idea of the students "selling" a punch if they forget classroom materials, but I haven't perfected the idea yet.

I'm really excited about using these in my classroom this year! If you are interested in using them yourself, they are available on my Teachers Pay Teachers store for free. That's right, FREE! You can download the file here. And as always, feel free to leave me comments on your own management strategies. I would love to hear them!

Thanks for reading.
-Ms. B

Friday, June 12, 2015

The Great Pencil Debate

Oh pencils.

Why do students consistently come to class without them? I already know through my experiences as a sub that pencils are a constant problem (especially for math class). So what can you do?

I've seen ideas like this all over Pinterest, and I just don't like them!
A great way to lose both pencils and student focus!
 I feel like students will just play with the colorful flag pencils, and with over 100 students, I don't have the time to keep track of 20 pencils that belong in my special teacher cup. I've seen other variations of this idea that involve keeping pencils at the front of the room and holding the students hostage until they are all returned, which seems both extreme and unfair to me.

The biggest issue I have with these ideas however, is that we are not teaching the students responsibility. We are reinforcing the idea to them that if they need something, someone will give it to them with no consequence. Responsibility is a BIG character trait that I want to teach in my classroom, especially with middle school students. 

I've thrown around a couple ideas in my head that will keep my sanity (and my precious pencils) intact. I've considered a bartering system where I trade one of my pencils for one of the students' items. The only issue I have with this idea is that the student is still able to borrow with almost no consequence. I also don't want to have students go back and forth to their lockers to retrieve an item to trade for a pencil. They may as well go back and get a pencil of their own, which is what I'm trying to avoid.

 Another idea I've had is to have them "buy" a pencil from me by turning in their positive behavior cards, a classroom management technique that will eventually be linked here. I like the idea of them having to "buy" a pencil from me, because it reinforces the need to be responsible for classroom materials, and it comes with a consequence. Super bonus is that I don't have to pretend to keep track of 20 magical teacher pencils that I know I will never get back. However, I am iffy about this strategy as well because I don't want students that have worked hard to fill their positive behavior card have to "sell" it to me because they forgot a pencil once the entire quarter. I've considered finding sad face stickers to cover up the punches on the card so the student "sells" me one punch instead of the entire thing. I've also considered putting negative marks on the back of the cards, but I don't necessarily want to highlight negative behaviors (or keep track of the extra positives once the card is full). I'm just not sure what to do. I will post an update when I come up with a strategy that I am happy with. 

What are some of your strategies for keeping track of pencils? Let me know in the comments. =)

-Ms. B

Friday, June 5, 2015

The First Post

Hi guys!

Welcome to my blog! I hope you enjoy seeing and reading about my experiences as a first year teacher. I just got my first teaching job at a Catholic school in Southern Illinois teaching Middle School math (yay!). Middle school math has been my dream job since I began the teaching program at my university, and I am so excited to finally have my own classroom! Over the next few weeks I will be posting some of my ideas for classroom setup, and beginning of the year procedures to (hopefully) keep my class running smoothly throughout the school year. Any comments/advice will be greatly appreciated by me and my kiddos. 

I hope we can create a great community of support here for other first year teachers, and educators in general. I would love to hear all of your comments/ideas about the lessons I post, and what works or doesn't work in your classroom. Until then, have a great summer break!

-Ms. B